Saturday, July 31, 2010
Which camera should I get?
So, which should you use? I get this question a lot from people who see me at concerts with 15 pounds of gear slung around my shoulders. The other most common discussion I have with people at concerts is that they discount the camera they have as incapable of doing what mine do. While I can't go into specific recommendations for everyone because everyone's needs and preferences are different, I'll address the choice between SLR (or "professional") cameras and what are called "compact" or "point-and-shoot" cameras.
1."The best camera is the one you have with you."
Not many people would put up with lugging around a metal bodied SLR with a equally heavy metal encased telephoto lens everywhere you go. So even if you had one laying around at your disposal, how often would you be lugging that to your friends house party or the family outing to the beach? Not likely. So a camera that sits on the shelf because it's too awkward to drag along doesn't take any photos. On the other hand most people have SOME camera on their person at all times. It's your cell phone.
In daylight or well lit interiors, even many cell phone cameras are very capable of capturing printable images. Remember the passenger jet that was forced to land in the Hudson River? Did you see the image of that plane in the water with all the passengers standing on the wings waiting to be rescued? That image was printed on the front page of newspapers all over the country. That image was taken on an iPhone.
2."Compact cameras are getting more and more capable."
In the last couple of years compact cameras have made leaps forward in terms of quality and capability. Early digital compact cameras weren't very good at even the simplest photographic tasks and didn't allow you any kind of control over how it captured those images. Today's compact cameras have features like panoramic stitching, wireless file transfer, and high definition video that aren't even possible with many if not all of the most expensive professional SLR cameras.
3. "Compact cameras produce images every bit as good as professional cameras for 90% of what you take photos of."
When I tell people this I don't think they really believe it, but consider this:
a. Most photos you take are of people.
b. Most of the photos of those people are taken at a range of 6-10 feet from you.
c. Most of those people are lit pretty well(either by the sun or inside a house where you want a decent amount of light to see by).
d. Do you want to worry about exposure, flash compensation, your focusing mode, your ISO sensitivity, depth of field, etc. when you grab a camera to take a quick grab shot of a friend doing something goofy? Didn't think so.
e. All of your photos will either end up on the internet or in a print that's no bigger than 4"X6". Don't fall for the megapixel numbers game. Why do you need a photo that's 4000 pixels wide if you're going to put all your images on the internet 500 pixels wide at most? It just fills up your hard drive and makes everything you do with your images on your computer slower.
So what do you need a big expensive professional camera for? Aside from just wanting to look like a professional (if that's your goal I think you have other issues), there are a few things you need a more capable, usually more expensive camera and lenses for.
a. More control. Don't like how the camera decided to expose a scene? The higher up the scale you go generally the more control you get over how the camera captures the image. Along with that comes more complexity though and it forces you to know more and more about how the camera actually works and what every button and wheel does. And with professional cameras, there are a lot more of those buttons and wheels.
b. Better images in tough exposure situations. What would that be? High contrast scenes, like a performer lit by a bright spotlight on a otherwise dark stage for example, fool a lot of compact cameras into making incorrect exposures because they're designed to try to make everything in the scene the same brightness. If you have a camera where you can override the automatic settings, you can tell the camera to only expose for certain parts of the frame or what exactly the exposure should be. Again, it takes a lot more understanding of how the camera works to make it work though.
c. Tough focusing situations. If you have two people in a scene at different distances from the camera and you only want to the focus to be sharp on one of them, a compact camera might decide that you want to focus on the other person, or on both equally. If you can't adjust that, well you're out of luck.
d. Artificial lighting, i.e.: flashes and studio lighting. If you need to light a large room (bigger than your living room) or light something farther away than 15-20 feet to photograph it, you may need a more powerful flash than the one that pops up on your camera. Most compact cameras don't have a mount for a external flash (called a "hot shoe") or the capability of triggering other flashes wirelessly. That's the kind of capability you get with professional SLR cameras. Likewise if you want to use the big studio strobes you see in professional photographers studios. Do you need that?
e. Low light situations. Badly lit areas where you don't want to (or can't) use a flash. SLR cameras with their larger image sensors excel at this. Their greater light gathering capability allows them to use higher shutter speeds that freeze the action and avoid the blurry images that most compact cameras will give you in dimly lit scenes.
And that's it. It sounds like a big list but it's not situations that most people find themselves in too often. Even in those instances, it's a trade off between convenience and control. Between how much time you want to spend learning about your camera and how much time you want to spend taking photos. My ultimate suggestion to anyone looking to move up to a more expensive camera is to look at the list above and ask yourself how often you run into those scenarios I've described and if having more control is worth the complication and extra heft. Then realize that your money would probably be better spent learning how to better use the camera you have first. People who buy expensive cameras and always leave them on automatic settings because they don't know how they work really wasted a lot of money.
So which photos in the example at the beginning were from which camera? Everything taken from the left and center was from my $2000 SLR camera/lens. Everything taken from the right and the photo of Chris with the ladies all around him was from our $200 Sony compact camera.
Monday, March 15, 2010
Concert season is right around the corner. Goodbye winter!
REO Speedwagon and Pat Benatar: Aug 20, 2010 - Detroit, MI DTE Energy Music Theatre
I've shot REO already but I love Pat Benatar. I'm a total sucker for kitchy 80's pop.
Paramore: May 4 - Grand Rapids, MI DeltaPlex
Moving from the 80's rockers to the young kids. Gotta start getting photos of newer acts. The median age of the bands I shoot is, well...too old. These guys are also touring with Tegan and Sara in the summer but as of today no dates have been announced. I'll be all over that one.
Lollapalooza: August 6-8 - Chicago, Grant Park
It was an amazing (and amazingly exhausting) experience last year that I hope to be able to revisit. The Strokes, Lady Gaga, Green Day, and a reunited Soundgarden are signed on already.
Kings Of Leon: 7-31, Detroit, MI DTE Energy Music Center
Meh. They're alright.
Elton John: 4-24, Grand Rapids, MI Van Andel Arena
Hey! It's Elton John For craps sake. Legend.
U2: 6-30, East Lansing, MI Spartan Stadium
I'd crawl over broken glass to shoot this. Not a very long ways, and I hope no one calls me out on this, but yeah...broken glass.
Nickelback: 5-19, Grand Rapids, MI Van Andel Arena
Hey, it's in my neighborhood. I'm gonna want to shoot it.
Daughtry: 5-28, Grand Rapids, MI Van Andel Arena
I met Chris Daughtry backstage in 2007 when he played Muskegon Summer Celebration and I was shooting for Pop Evil. Really nice guy. Signed a CD cover for me even though his manager was sticking a phone in his face to do a radio interview. Thanks Chris. You're a pretty good singer too.
Carrie Underwood: 4-23, Grand Rapids, MI Van Andel Arena
I haven't shot much in the way of country artists. Maybe because I'm not a big fan of newer country music so I don't know who's worth shooting. It's a different world musically than I come from.
Tom Petty and The Heartbreakers: 7-22, Detroit, MI Palace Of Auburn Hills
The Heartbreakers were the first arena show I ever shot. I'd love to go back and revisit them.
The Swell Season: 5-15, Kalamazoo, MI State Theater
Ohhhh. I can't wait for this one. This will be a date night with Danielle. We both love this group.
So far that's what catches my eye. It's early yet though and many venues have pretty empty schedules after May. That won't last long. Anything I missed?
Sunday, February 21, 2010
Better Photography On A Budget Part 2: Camera Stabilization
Saturday, February 6, 2010
Expressing Yourself Through Photography: Depth of Field
-7.jpg) This is a shot of Dweezil Zappa playing at Rothbury in 2009. The only parts of the photo in focus are the hands and the parts of the guitar around the hands. The parts closer, such as the lettering on the toggle switch, and things farther away, like his shirt or the lighting rig behind him, are out of focus. This was shot with a fairly long focal length (about 155mm), from about 6-7 feet away with an aperture of f/5. Notice it has just the parts I wanted to bring attention to in focus and everything else falls out of focus so as not to distract attention from the subject.
This is a shot of Dweezil Zappa playing at Rothbury in 2009. The only parts of the photo in focus are the hands and the parts of the guitar around the hands. The parts closer, such as the lettering on the toggle switch, and things farther away, like his shirt or the lighting rig behind him, are out of focus. This was shot with a fairly long focal length (about 155mm), from about 6-7 feet away with an aperture of f/5. Notice it has just the parts I wanted to bring attention to in focus and everything else falls out of focus so as not to distract attention from the subject.Thursday, January 28, 2010
Expressing Yourself Through Photography: Shutter Speed
.jpg)
-8.jpg)
-19.jpg)
Tuesday, January 26, 2010
Better Photography On A Budget Part 1: Macro Photography
Buying lenses designed for macro photography can an expensive proposition. This Nikon 105mm VR macro for example.
This is a standard 50mm f1.8 lens:
If you don't have one, you should. Not to get off topic but no one lens will advance your photography skills like this one. Every camera manufacturer makes one. They're cheap,they have a wide aperture so you can shoot in low light, and the focal length actually makes it a decent portrait lens on digital cameras. It's not a zoom so you're forced to move your feet to compose the shot which is actually a good thing for beginners because it makes you think more about your framing and how distance effects your perspective. But...I digress. Back to the subject at hand.
How does this lens pertain to macro photography? The closest you can be to your subject according to the specs is 1 1/2 feet. Pretty close but not hardly close enough for what we want to do. So, what we want do do is this:
-1.jpg)
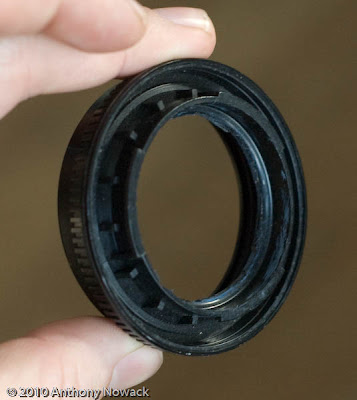
That looks a little different, huh? What I've done is just make a mount that will allow me to put a lens on backwards. Which with this lens makes it able to focus really REALLY close. Actually, that's all it can do. Without actually being connected to the body electronically there's no auto-focus, you have to adjust the aperture manually, and you lose any lens related metadata that is usually written into your files. But you have a (super) macro lens for next to no money.
Here's what the mount looks like:
-2.jpg)
-3.jpg)
It consists of a UV filter that I took the glass out of (carefully), and a body cap that comes with every slr camera that goes in the place of your lens when you don't have one on. If you're like me, there's always a lens on your camera though so this thing was just collecting dust anyway. If you have to buy one, I think they only cost a couple bucks. Same with a cheap filter. Many camera stores have bins of used filters that they'll give you for next to nothing. Doesn't matter what kind of course because you're going to break the glass out of it anyway. Just get one that matches the thread size of your lens, in my case 52mm.
Take the body cap and cut the center out with a sharp tool (VERY carefully, it might be thick). Then super glue the cap and the glass free filter ring face to face so that you can screw it to the front of your lens when you're done. Let this sit for at least a couple hours to dry. Super glue will bond instantly but it also gives off fumes that like to make a nasty coating on glass. DO NOT put this on your camera or lens right away. If you can find a fume free adhesive that works just as well, let me know. I'd love to not have to use this stuff. When you're done and fume free, mount the lens and find some subjects you'd like to get really close to.
A couple things to keep in mind with macro photography:
1. The focus distance is VERY limited. We're talking centimeters.
2. The depth of focus is paper thin. Even at narrow apertures. I'd start out with two dimensional subjects.
3. "You're gonna need a bigger light." Lighting is another challenge because you're so close and shooting at narrow apertures to get any kind of focus depth that you need to throw a lot of light in. Watch out for shadows from the lens too.
4. Use a tripod. Handholding your camera while shooting this close is a recipe for frustration. Not only are your vibrations magnified as much as your subject, but moving just a couple centimeters back or forward will change your focus drastically.
5. Be careful not to actually hit your subject with the lens. You're going to be about that close.
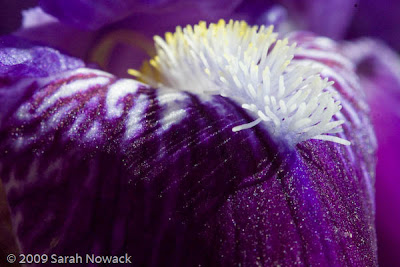
Macro photography is definitely a challenging endevour but the results are unlike anything you can get other wise. Here's a photo my daughter took of a flower with this set up:
-3.jpg)
I'd love to see your results as well. Feel free to experiment with different lenses and materials. You're not actually doing anything to the lens itself so try this with whatever you've got.
Wednesday, January 20, 2010
New blog series and more
But this isn't ultimately about gear. It's about thinking differently about how to make photos. If you have a photographic challenge, it's easy to throw money at it. Photography is one of the few lines of work where you can essentially buy into your job. Ultimately, though, as a photographer you're judged by your work, not what you used to create that work. So however you get to your photographic goals, the important thing is that you get that shot. After that, whatever you put together to get it doesn't matter. But thinking differently about what we value about photography does.
I'll also be posting more informative blogs about the basics of photography. Things as rudimentary as exposure, aperture, and composition all the way up to the infinite variables of lighting techniques. I've had people ask me about putting on classes or workshops, and while I'm leaving that door open, I thought I'd rather reach a wider audience with my blog. Then if you learn something useful that you'd like to try, you can spend the money you would have spent on classes instead on that new lens or a tripod or some other tool to expand your photographic palette. Then if you choose to support what I'm doing, you can use the links I'm providing to get those things and I'll get a little kick-back. Kinda like PBS except there's no pledge drives and the "thank you gifts" are much better.
I saw an interview with Quentin Tarantino once where he was asked what his advice for aspiring filmmakers was and he said basically just to get out there and do it. Spend the money you would have spent on school on a camera instead because you'll learn faster just doing it than sitting in a classroom. I would also add there's things that experience will teach you that you can't learn otherwise. So I'd also like to see people posting their results and experiences with the subjects I cover. Art is more than a lecture. It's a conversation.
Saturday, January 16, 2010
2009. Best…year…ever. (Part 3: August and Everything After)
Well August was a busy month. Didn't even realize how much so until I look back now. Started out with Kenny Rogers at Meijer Gardens. Las Vegas came to Grand Rapids that night. I think Kenny talked as much as he sang.
The next morning it was off to Chicago with Lindsay for Lollapalooza. And then it rained. Did I plan for this possibility and maybe bring rain gear? Not a chance. That would have made sense. I'm usually a lot more prepared for a shoot. Guess it didn't occur to me to check the weather report before I left. Many of the participants there made the best off it though.
I found a vendor selling ponchos though(it was very a popular place) and I was set. The rain stopped in time for Depeche Mode, thankfully.
Thanks to Brad Southerton we had a place to sleep every night. And I did. At least 4 hours each night.
There were some great surprises. LeAnn Rimes singing Beatles songs with Perry Farrell for example.
-3.jpg)
Or getting my daughter, Sarah, on the phone with the girls from Care Bears On Fire.
It stayed dry the rest of the weekend, thankfully. Oh, and there was the Playboy party at the hotel too. Not much to tell there. Ironic, eh? Most disappointing part of the weekend... Tool. If I did drugs it would probably have been cool. But instead, I was a quite sober photographer with nothing to take photos of. The singer, Maynard James Keenan stayed at the back of the stage with no lights on him. I was told he hates photographers and the way they set up the stage kinda makes me believe it. Unfortunate, because they were one of the bands I was really looking forward to getting photos of.
Justin Chancellor of Tool
Later in the month we also were privileged to witness our friends John and Karisa get married.
John and Karisa sitting in a tree...
In September we took in the Artprize scene,
and we opened an art show of our own in Cedar Springs.
We were also able to take the kids on a trip to Cedar Point which seems to have been the highlight of their lives so far.
In October we made a trip back down to Chicago for Brad's birthday.
Luckily, we walked to the bar from Brad's apartment so no one had to end up like the woman we saw on the way down in Benton Harbor who took the wrong way out of the parking lot.
I also threw a party for Danielle's birthday. All of our friends came and Kenny got schooled on the Rock Band drums by my 12 year old daughter.
Also did photos of some young kid named Taylor Swift earlier in the month. I think she'll probably be big.
November was a busy month. Metallica, and Megadeth were the big concerts of the month.
This is the look Lars gives when he sees people actually buy CD's.
Dave Mustaine and his poodle-do
We also had the opportunity to photograph the rehearsals for the Civic Theater production of Cinderella,
and we got to shoot photos for Lou Musa for his DiAddario strings endorsement.
Next stop, full page ad in Guitar World magazine! (hopefully)
December was pretty slow photo wise with the holiday's and Sarah's birthday. We did find an abandoned building near here that was interesting to photograph though
Hallway in abandoned building.
Cassette tapes and catalogs in abandoned building.
and I got out once to do a little photo walk with Randall downtown GR.
Saturday, January 2, 2010
2009. Best...year...ever. (Part 2: June and July)
June. Kicked off the summer concert season with a triple header night of shows with Rockit King. Started out easy enough at Fifth Third Ballpark opening for Kansas. Beautiful sunny and warm. No problems except the guy at the gate who almost wouldn't let me in with my telephoto lens.
After the Fifth Third Ballpark gig everyone headed downtown to play under the La Grande Vitesse at Festival Of The Arts. It was great staging with the enormous metal sculpture looming over the stage. A huge light from a building across the street provided a great backlight.
And then the rain came down.
Everyone rushed to get all the gear off the stage and under the tent and as soon as we did....the rain stopped. Well, it made for interesting photos anyway.
All that was left was gig number 3 for the night: Mulligans Other Side. AKA: A closet with a stage. No lighting save for a DJ style gobo screwed to the back wall. No AC or ventilation. Wanna know how hot it gets in there? Damn hot.
3 gigs in one night. Even I was exhausted and I didn't play a note.
Later in the month we got to see Indigo Girls at the Meijer Gardens and we shot photos for The Broadcast Union.
July. Started out with a bang. Rothbury. 3 days of bathing with baby wipes, walking for miles, and smelling dirty hippie funk. It was also 3 days of great music, meeting great people, and seeing some amazing sights.

-9.jpg)