Thursday, January 28, 2010

Expressing Yourself Through Photography: Shutter Speed

If photography is capturing a moment in time, it's your shutter speed that determines how long that moment lasts. It opens at the beginning of an exposure to let light into the camera and closes at the end. The longer the shutter is open, the brighter the image will be. On the other hand, the quicker the shutter speed, the more likely you are to freeze your subject and not get blur.

The shutter in a SLR-type camera (film or digital) is kind of like the horizontal blinds you might have on your windows. Just like those blinds, they pull up to let the light in and drop back down to cut it off. In small digital "point-and shoot" type cameras, they don't have a physical shutter but they achieve the same result by just turning the digital sensor on and off. Either way, it's essentially the same result.

A good rule of thumb for shutter speed to get sharp images is at least 1/focal length. Which means if you're shooting with a 100mm lens or a zoom lens set to 100mm, you should be shooting at a shutter speed of at least 1/100th of a second. I say "at least" because especially if you're a beginning photographer, you may want to err on the side of a faster shutter if you can to compensate for your still developing camera holding technique. Holding your camera steady is a very important aspect to getting sharp photos at any shutter speed, and I'll be covering this topic on a future blog of it's own. For now suffice to say that it's better to give yourself a couple clicks faster shutter if you can, rather than get blurry images and wish you had later.

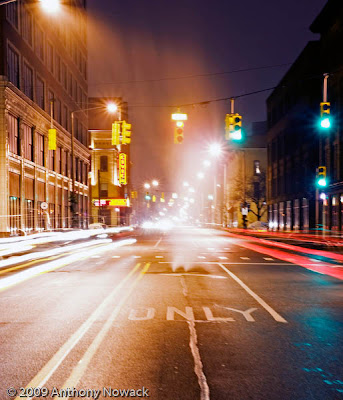
Now that we have the basics taken care of, what can we do to use these rules to be creative? Well, you can do something like this:


This is a composite of two images. One taken to capture the cars going away from me and one for the cars coming toward me. Each exposure was for 10 seconds at f/11. Obviously, you couldn't hold the camera very still for this long so a tripod is used.

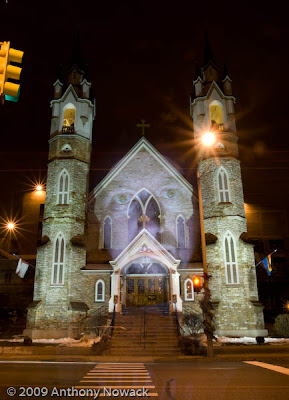
If you wanted to take this technique a little further you can introduce a flash to do something like this:


This was a 20 second exposure at f/20 where I simply stepped in front of the camera during the exposure and manually popped a flash that I was holding under my face. Since the flash didn't hit the rest of my body, it doesn't show up in the photo and when I stepped away, the church behind me was exposed by the street lights.

Now lets take it a couple steps further and combine an on camera flash, a zoom lens and motion in the equation:


I took this photo of a man in the audience at a Grateful Dead show who was swinging torches around himself on the ends of chains. It's an example of a technique I developed for shooting performances involving fire that is a combination of a long exposure, a zoom lens, and what is called "rear-curtain flash sync". Rear curtain sync means the camera fires the flash at the end of the exposure instead of the beginning. It's also called "dragging the shutter". Not every camera can do it, however, because with the short exposures that you normally use for snapshots it doesn't really matter when the flash goes off, but if you want to show a subject in motion, you'll want to freeze them at the end of a motion through a frame not at the beginning. Otherwise, they look like they're going backwards. Unless that's what you're after, in which case leave the camera on it's normal setting.

I also zoomed from the long end of my lens' range to the wide end during the exposure to give it the impression of being two exposures and to give it a three dimensional look with the fire coming out at you.

I hope that gives you some basics on the theory of shutter speed as well as some ideas on how you can use it creatively. As always, I'd love to see what you've done with it or if you have other tips of suggestions.

If you learned something useful from my site and want to help me keep it going you can buy through our affiliate Amazon.com Camera Store

Tuesday, January 26, 2010

Better Photography On A Budget Part 1: Macro Photography

One of the best things about photography is the ability to look at things in a different way than you can with the naked eye. Some examples include: short depth of field, wide-angle distortion, exaggerated perspectives, alternative color processing techniques, and even black and white. One of the more obvious forms of this is macro photography. Macro photography is making a 1:1 reproduction on film or a digital sensor, but the term is used often to describe any kind of extreme close-up photography. Most camera lenses can't do macro (even though many say they can), because they just can't focus that closely. They're designed to focus in the range that most pictures are taken, which isn't normally inches away. For macro photography, getting that close to your subject is usually necessary.

Buying lenses designed for macro photography can an expensive proposition. This Nikon 105mm VR macro for example. Especially if you're not sure how much you're going to use it. I have an alternative method that may let you dip your toe in the macro water before diving in head (and wallet) first.

This is a standard 50mm f1.8 lens:


If you don't have one, you should. Not to get off topic but no one lens will advance your photography skills like this one. Every camera manufacturer makes one. They're cheap,they have a wide aperture so you can shoot in low light, and the focal length actually makes it a decent portrait lens on digital cameras. It's not a zoom so you're forced to move your feet to compose the shot which is actually a good thing for beginners because it makes you think more about your framing and how distance effects your perspective. But...I digress. Back to the subject at hand.

How does this lens pertain to macro photography? The closest you can be to your subject according to the specs is 1 1/2 feet. Pretty close but not hardly close enough for what we want to do. So, what we want do do is this:


That looks a little different, huh? What I've done is just make a mount that will allow me to put a lens on backwards. Which with this lens makes it able to focus really REALLY close. Actually, that's all it can do. Without actually being connected to the body electronically there's no auto-focus, you have to adjust the aperture manually, and you lose any lens related metadata that is usually written into your files. But you have a (super) macro lens for next to no money.

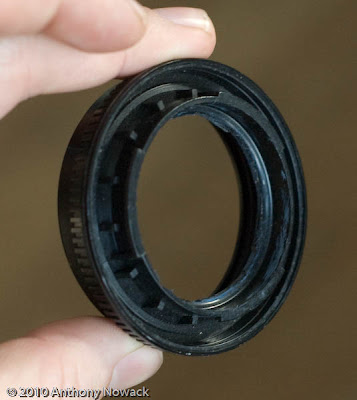
Here's what the mount looks like:


It consists of a UV filter that I took the glass out of (carefully), and a body cap that comes with every slr camera that goes in the place of your lens when you don't have one on. If you're like me, there's always a lens on your camera though so this thing was just collecting dust anyway. If you have to buy one, I think they only cost a couple bucks. Same with a cheap filter. Many camera stores have bins of used filters that they'll give you for next to nothing. Doesn't matter what kind of course because you're going to break the glass out of it anyway. Just get one that matches the thread size of your lens, in my case 52mm.

Take the body cap and cut the center out with a sharp tool (VERY carefully, it might be thick). Then super glue the cap and the glass free filter ring face to face so that you can screw it to the front of your lens when you're done. Let this sit for at least a couple hours to dry. Super glue will bond instantly but it also gives off fumes that like to make a nasty coating on glass. DO NOT put this on your camera or lens right away. If you can find a fume free adhesive that works just as well, let me know. I'd love to not have to use this stuff. When you're done and fume free, mount the lens and find some subjects you'd like to get really close to.

A couple things to keep in mind with macro photography:
1. The focus distance is VERY limited. We're talking centimeters.
2. The depth of focus is paper thin. Even at narrow apertures. I'd start out with two dimensional subjects.
3. "You're gonna need a bigger light." Lighting is another challenge because you're so close and shooting at narrow apertures to get any kind of focus depth that you need to throw a lot of light in. Watch out for shadows from the lens too.
4. Use a tripod. Handholding your camera while shooting this close is a recipe for frustration. Not only are your vibrations magnified as much as your subject, but moving just a couple centimeters back or forward will change your focus drastically.
5. Be careful not to actually hit your subject with the lens. You're going to be about that close.

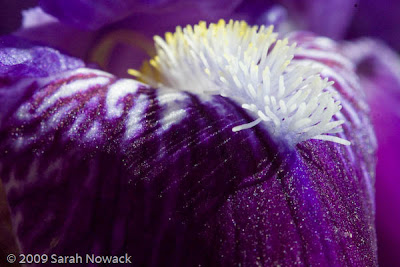
Macro photography is definitely a challenging endevour but the results are unlike anything you can get other wise. Here's a photo my daughter took of a flower with this set up:


I'd love to see your results as well. Feel free to experiment with different lenses and materials. You're not actually doing anything to the lens itself so try this with whatever you've got.

If you learned something useful from my site and want to help me keep it going you can buy through our affiliate Amazon.com Camera Store

Wednesday, January 20, 2010

New blog series and more

I'm taking up a new track for my my blog. I'm going to be starting a new series of articles with tips and tricks to help you explore new photographic avenues without re-mortgaging your house. I'll be showing you ways to modify things you might already have, inexpensive gear to buy that will do the job of much more expensive gear, and techniques that may save you from buying anything at all. I'm a Nikon shooter so many of my specific equipment recommendations will be Nikon-centric, but other manufacturers (Canon, Pentax, Sony, etc.) will have similar or equivalent pieces that will also work. Along the way, if I make a recommendation on equipment, I'll insert links to a website or two where you can find them, and clicking those links and buying through them will help me keep the website going.

But this isn't ultimately about gear. It's about thinking differently about how to make photos. If you have a photographic challenge, it's easy to throw money at it. Photography is one of the few lines of work where you can essentially buy into your job. Ultimately, though, as a photographer you're judged by your work, not what you used to create that work. So however you get to your photographic goals, the important thing is that you get that shot. After that, whatever you put together to get it doesn't matter. But thinking differently about what we value about photography does.

I'll also be posting more informative blogs about the basics of photography. Things as rudimentary as exposure, aperture, and composition all the way up to the infinite variables of lighting techniques. I've had people ask me about putting on classes or workshops, and while I'm leaving that door open, I thought I'd rather reach a wider audience with my blog. Then if you learn something useful that you'd like to try, you can spend the money you would have spent on classes instead on that new lens or a tripod or some other tool to expand your photographic palette. Then if you choose to support what I'm doing, you can use the links I'm providing to get those things and I'll get a little kick-back. Kinda like PBS except there's no pledge drives and the "thank you gifts" are much better.

I saw an interview with Quentin Tarantino once where he was asked what his advice for aspiring filmmakers was and he said basically just to get out there and do it. Spend the money you would have spent on school on a camera instead because you'll learn faster just doing it than sitting in a classroom. I would also add there's things that experience will teach you that you can't learn otherwise. So I'd also like to see people posting their results and experiences with the subjects I cover. Art is more than a lecture. It's a conversation.

If you learned something useful from my site and want to help me keep it going you can buy through our affiliate Amazon.com Camera Store

Saturday, January 16, 2010

2009. Best…year…ever. (Part 3: August and Everything After)

Well August was a busy month. Didn't even realize how much so until I look back now. Started out with Kenny Rogers at Meijer Gardens. Las Vegas came to Grand Rapids that night. I think Kenny talked as much as he sang.


The next morning it was off to Chicago with Lindsay for Lollapalooza. And then it rained. Did I plan for this possibility and maybe bring rain gear? Not a chance. That would have made sense. I'm usually a lot more prepared for a shoot. Guess it didn't occur to me to check the weather report before I left. Many of the participants there made the best off it though.


I found a vendor selling ponchos though(it was very a popular place) and I was set. The rain stopped in time for Depeche Mode, thankfully.


Thanks to Brad Southerton we had a place to sleep every night. And I did. At least 4 hours each night.


There were some great surprises. LeAnn Rimes singing Beatles songs with Perry Farrell for example.


Or getting my daughter, Sarah, on the phone with the girls from Care Bears On Fire.

It stayed dry the rest of the weekend, thankfully. Oh, and there was the Playboy party at the hotel too. Not much to tell there. Ironic, eh? Most disappointing part of the weekend... Tool. If I did drugs it would probably have been cool. But instead, I was a quite sober photographer with nothing to take photos of. The singer, Maynard James Keenan stayed at the back of the stage with no lights on him. I was told he hates photographers and the way they set up the stage kinda makes me believe it. Unfortunate, because they were one of the bands I was really looking forward to getting photos of.


Justin Chancellor of Tool

Later in the month we also were privileged to witness our friends John and Karisa get married.


John and Karisa sitting in a tree...

In September we took in the Artprize scene,

Paper Airplanes and Melodies on Monroe


and we opened an art show of our own in Cedar Springs.


We were also able to take the kids on a trip to Cedar Point which seems to have been the highlight of their lives so far.


In October we made a trip back down to Chicago for Brad's birthday.


Luckily, we walked to the bar from Brad's apartment so no one had to end up like the woman we saw on the way down in Benton Harbor who took the wrong way out of the parking lot.


I also threw a party for Danielle's birthday. All of our friends came and Kenny got schooled on the Rock Band drums by my 12 year old daughter.


Also did photos of some young kid named Taylor Swift earlier in the month. I think she'll probably be big.

November was a busy month. Metallica, and Megadeth were the big concerts of the month.


This is the look Lars gives when he sees people actually buy CD's.

Dave Mustaine and his poodle-do

We also had the opportunity to photograph the rehearsals for the Civic Theater production of Cinderella,

and we got to shoot photos for Lou Musa for his DiAddario strings endorsement.


Next stop, full page ad in Guitar World magazine! (hopefully)

December was pretty slow photo wise with the holiday's and Sarah's birthday. We did find an abandoned building near here that was interesting to photograph though


Hallway in abandoned building.


Cassette tapes and catalogs in abandoned building.

and I got out once to do a little photo walk with Randall downtown GR.


In the shadow of Calder.

So that was 2009. I skipped over quite a bit. Neko Case, Chickenfoot, more art photos I didn't cover, and lots of local shows. It was a busy year.


Goal for 2010? To quit my day job and do this for a living. Anybody know of any job openings for photographers?

Saturday, January 2, 2010

2009. Best...year...ever. (Part 2: June and July)

June. Kicked off the summer concert season with a triple header night of shows with Rockit King. Started out easy enough at Fifth Third Ballpark opening for Kansas. Beautiful sunny and warm. No problems except the guy at the gate who almost wouldn't let me in with my telephoto lens.


After the Fifth Third Ballpark gig everyone headed downtown to play under the La Grande Vitesse at Festival Of The Arts. It was great staging with the enormous metal sculpture looming over the stage. A huge light from a building across the street provided a great backlight.


And then the rain came down.


Everyone rushed to get all the gear off the stage and under the tent and as soon as we did....the rain stopped. Well, it made for interesting photos anyway.


All that was left was gig number 3 for the night: Mulligans Other Side. AKA: A closet with a stage. No lighting save for a DJ style gobo screwed to the back wall. No AC or ventilation. Wanna know how hot it gets in there? Damn hot.


3 gigs in one night. Even I was exhausted and I didn't play a note.


Later in the month we got to see Indigo Girls at the Meijer Gardens and we shot photos for The Broadcast Union.

July. Started out with a bang. Rothbury. 3 days of bathing with baby wipes, walking for miles, and smelling dirty hippie funk. It was also 3 days of great music, meeting great people, and seeing some amazing sights.


Photographers covering Rothbury. I'm in the back left of center. Photo courtesy Steve Galli.

Photographers Steve Galli and Leni Sinclair backstage before The Dead. 4th of July.

By the time Bob Dylan took the stage Sunday night I was so exhausted I could barely hold my camera up. (Which would have been a lot easier, by the way, if the monopod and tripod hadn't fallen out of my trunk onto the highway on the way to up Rothbury.) Shot photos of 17 bands and took just under 2900 frames. Ate way too many energy bars as meals and learned why having your own internet connection is important (The internet in the media tent was non-existent). Highlights: Hard Lessons, Grace Potter, and Ani DiFranco.

Fireworks over the main stage 4th Of July while The Dead jammed incoherantly.