
First off, I'd like you to take a look at the images in this article that my wife, Danielle, and I put together: 10 Things To Know About Chris Isaak. Which of these photos was taken with $2000 camera and lens, and which were taken with a $200 camera? Can you tell?
So, which should you use? I get this question a lot from people who see me at concerts with 15 pounds of gear slung around my shoulders. The other most common discussion I have with people at concerts is that they discount the camera they have as incapable of doing what mine do. While I can't go into specific recommendations for everyone because everyone's needs and preferences are different, I'll address the choice between SLR (or "professional") cameras and what are called "compact" or "point-and-shoot" cameras.
1."The best camera is the one you have with you."
Not many people would put up with lugging around a metal bodied SLR with a equally heavy metal encased telephoto lens everywhere you go. So even if you had one laying around at your disposal, how often would you be lugging that to your friends house party or the family outing to the beach? Not likely. So a camera that sits on the shelf because it's too awkward to drag along doesn't take any photos. On the other hand most people have SOME camera on their person at all times. It's your cell phone.
In daylight or well lit interiors, even many cell phone cameras are very capable of capturing printable images. Remember the passenger jet that was forced to land in the Hudson River? Did you see the image of that plane in the water with all the passengers standing on the wings waiting to be rescued? That image was printed on the front page of newspapers all over the country. That image was taken on an iPhone.
2."Compact cameras are getting more and more capable."
In the last couple of years compact cameras have made leaps forward in terms of quality and capability. Early digital compact cameras weren't very good at even the simplest photographic tasks and didn't allow you any kind of control over how it captured those images. Today's compact cameras have features like panoramic stitching, wireless file transfer, and high definition video that aren't even possible with many if not all of the most expensive professional SLR cameras.
3. "Compact cameras produce images every bit as good as professional cameras for 90% of what you take photos of."
When I tell people this I don't think they really believe it, but consider this:
a. Most photos you take are of people.
b. Most of the photos of those people are taken at a range of 6-10 feet from you.
c. Most of those people are lit pretty well(either by the sun or inside a house where you want a decent amount of light to see by).
d. Do you want to worry about exposure, flash compensation, your focusing mode, your ISO sensitivity, depth of field, etc. when you grab a camera to take a quick grab shot of a friend doing something goofy? Didn't think so.
e. All of your photos will either end up on the internet or in a print that's no bigger than 4"X6". Don't fall for the megapixel numbers game. Why do you need a photo that's 4000 pixels wide if you're going to put all your images on the internet 500 pixels wide at most? It just fills up your hard drive and makes everything you do with your images on your computer slower.
So what do you need a big expensive professional camera for? Aside from just wanting to look like a professional (if that's your goal I think you have other issues), there are a few things you need a more capable, usually more expensive camera and lenses for.
a. More control. Don't like how the camera decided to expose a scene? The higher up the scale you go generally the more control you get over how the camera captures the image. Along with that comes more complexity though and it forces you to know more and more about how the camera actually works and what every button and wheel does. And with professional cameras, there are a lot more of those buttons and wheels.
b. Better images in tough exposure situations. What would that be? High contrast scenes, like a performer lit by a bright spotlight on a otherwise dark stage for example, fool a lot of compact cameras into making incorrect exposures because they're designed to try to make everything in the scene the same brightness. If you have a camera where you can override the automatic settings, you can tell the camera to only expose for certain parts of the frame or what exactly the exposure should be. Again, it takes a lot more understanding of how the camera works to make it work though.
c. Tough focusing situations. If you have two people in a scene at different distances from the camera and you only want to the focus to be sharp on one of them, a compact camera might decide that you want to focus on the other person, or on both equally. If you can't adjust that, well you're out of luck.
d. Artificial lighting, i.e.: flashes and studio lighting. If you need to light a large room (bigger than your living room) or light something farther away than 15-20 feet to photograph it, you may need a more powerful flash than the one that pops up on your camera. Most compact cameras don't have a mount for a external flash (called a "hot shoe") or the capability of triggering other flashes wirelessly. That's the kind of capability you get with professional SLR cameras. Likewise if you want to use the big studio strobes you see in professional photographers studios. Do you need that?
e. Low light situations. Badly lit areas where you don't want to (or can't) use a flash. SLR cameras with their larger image sensors excel at this. Their greater light gathering capability allows them to use higher shutter speeds that freeze the action and avoid the blurry images that most compact cameras will give you in dimly lit scenes.
And that's it. It sounds like a big list but it's not situations that most people find themselves in too often. Even in those instances, it's a trade off between convenience and control. Between how much time you want to spend learning about your camera and how much time you want to spend taking photos. My ultimate suggestion to anyone looking to move up to a more expensive camera is to look at the list above and ask yourself how often you run into those scenarios I've described and if having more control is worth the complication and extra heft. Then realize that your money would probably be better spent learning how to better use the camera you have first. People who buy expensive cameras and always leave them on automatic settings because they don't know how they work really wasted a lot of money.
So which photos in the example at the beginning were from which camera? Everything taken from the left and center was from my $2000 SLR camera/lens. Everything taken from the right and the photo of Chris with the ladies all around him was from our $200 Sony compact camera.
Saturday, July 31, 2010
Monday, March 15, 2010
Concert season is right around the corner. Goodbye winter!
Seemingly coinciding perfectly with the melting of the last of the snow, announcements for Spring and Summer concert tours are coming out everyday. Here's a few I'm excited about and hope to be able to shoot in no particular order:
REO Speedwagon and Pat Benatar: Aug 20, 2010 - Detroit, MI DTE Energy Music Theatre
I've shot REO already but I love Pat Benatar. I'm a total sucker for kitchy 80's pop.
Paramore: May 4 - Grand Rapids, MI DeltaPlex
Moving from the 80's rockers to the young kids. Gotta start getting photos of newer acts. The median age of the bands I shoot is, well...too old. These guys are also touring with Tegan and Sara in the summer but as of today no dates have been announced. I'll be all over that one.
Lollapalooza: August 6-8 - Chicago, Grant Park
It was an amazing (and amazingly exhausting) experience last year that I hope to be able to revisit. The Strokes, Lady Gaga, Green Day, and a reunited Soundgarden are signed on already.
Kings Of Leon: 7-31, Detroit, MI DTE Energy Music Center
Meh. They're alright.
Elton John: 4-24, Grand Rapids, MI Van Andel Arena
Hey! It's Elton John For craps sake. Legend.
U2: 6-30, East Lansing, MI Spartan Stadium
I'd crawl over broken glass to shoot this. Not a very long ways, and I hope no one calls me out on this, but yeah...broken glass.
Nickelback: 5-19, Grand Rapids, MI Van Andel Arena
Hey, it's in my neighborhood. I'm gonna want to shoot it.
Daughtry: 5-28, Grand Rapids, MI Van Andel Arena
I met Chris Daughtry backstage in 2007 when he played Muskegon Summer Celebration and I was shooting for Pop Evil. Really nice guy. Signed a CD cover for me even though his manager was sticking a phone in his face to do a radio interview. Thanks Chris. You're a pretty good singer too.
Carrie Underwood: 4-23, Grand Rapids, MI Van Andel Arena
I haven't shot much in the way of country artists. Maybe because I'm not a big fan of newer country music so I don't know who's worth shooting. It's a different world musically than I come from.
Tom Petty and The Heartbreakers: 7-22, Detroit, MI Palace Of Auburn Hills
The Heartbreakers were the first arena show I ever shot. I'd love to go back and revisit them.
The Swell Season: 5-15, Kalamazoo, MI State Theater
Ohhhh. I can't wait for this one. This will be a date night with Danielle. We both love this group.
So far that's what catches my eye. It's early yet though and many venues have pretty empty schedules after May. That won't last long. Anything I missed?
Sunday, February 21, 2010
Better Photography On A Budget Part 2: Camera Stabilization
To get sharp images you need three things: a stationary subject, a stable camera, and a high enough shutter speed to freeze that subject before motion occurs either on their end or yours. You can compensate for lack of shutter speed or moving subjects by doing a couple of things. One, develop a stable hand holding technique. Two, use lenses that incorporate some kind of vibration cancelling mechanism. Three, use something to mount the camera to in order to stabilize it.
Let's work backwards and cover external ways to stabilize your camera first. The most popular method are tripods. Now this goes against my nature, but don't buy a cheap tripod. Yes, I know, the whole point of these articles is not spending money. When it comes to tripods though, you definitely get what you pay for. Now I would never say a hobbyist should go out and drop $500 on a tripod. Nor would I wish those chinzy things they sell at Best Buy on anyone. What I've found is that the middle ground is superb in this field. Let me reiterate: Don't buy $20 tripods! They will cause you more frustration then they're worth. I've got 3 broken ones to attest to that. What I use is a Manfrotto 190XDB. Looks like this:
There are a million models and brands out there though. My advice would be to look for a brand that makes VERY nice models and get something down the line farther, instead of finding a brand that makes really cheap ones and buying their better model. I don't usually gush over equipment but this tripod has never disappointed me. As far as I'm concerned, with equipment it just has to work, stay working after it's been beaten on and stay out of the way. I've had this tripod drop out of my trunk on the highway and not only survive but work perfectly. Compare that to cheap tripods I've had that just broke while I was using them normally.
Another option if you can't bring a tripod is a monopod. As it's name suggests, it's just a single leg that extends instead of three. Sometimes, a tripod just isn't practical and sometimes it's prohibited. When we visited the Mammoth Caves for example, tripods were not allowed. Same with most concerts and sporting events. So a monopod is a practical solution. Essentially, your legs become the other sides of the tripod. Here I can make an inexpensive suggestion. The monopod I carry now is made by OSN and it's sold at Meijer and Walmart. It cost about $20 but it's been great. It's stable and solid. Usually I'd say stay away from camera equipment at the department stores but this has been a pleasant surprise.
Your camera can just attach to these by the screw hole in the bottom. Unless you want to shoot in landscape orientation and be very limited in your movement however, you're going to need a head. There are many different types of heads for different purposes, but I like ball heads for general use. Whatever kind you get, be sure to get a head that's big enough to support the camera and lens you'll be using. The descriptions on the packaging or website should tell you how much weight they'll hold.
Couple of tips for tripods. One, watch out for high wind. Nothing will stop your heart quicker than watching your camera get blown over while you stepped away. Two, if you need a little extra stability, try hanging something under the center of the tripod. Many people have carried an empty milk jug and filled it with water or rocks on site. More weight means it's more difficult for wind or vibrations to effect your photos. Three, most tripods and monopods worth their salt have convertible feet that can be either rubber for hard floors or a metal spike for dirt.
For times when you have to hand hold the camera, lenses with vibration compensation are very useful. Some camera makers actually build it into the cameras themselves. The two major companies, Canon and Nikon, have chosen to do it with their lenses though. Canon calls theirs "Image Stabilization" or "IS" and Nikon calls their lenses "Vibration Reduction" or "VR". Sigma and Tamron also have lenses that use this technology. How it works is that the lens actually senses your movement and moves one of the pieces of glass inside the lens to compensate. Pretty wild. Unfortunately, it only helps dampen your movements. So if you have a moving subject in dim light, it's not as helpful. Most lenses with this technology are pretty expensive. The exception would be the Nikon 18-55mm and 55-200mm VR lenses. They're plastic so don't abuse them, but the heavier pro versions cost more than ten times as much. I've owned the 55-200 and I can definitely vouch for it. It's probably the best deal on a lens out there at around $200.
Now we'll get to the cheapest way to sharpen up your images. You. Handholding technique is important even when using stabilized lenses. One of the bad habits people get into are putting your elbows out when you hold the camera up or holding the camera way out in front of you. The farther out your arms go from your body, the more prone you are to vibration and the heavier that camera is going to feel. So get those elbows in close to your body. I've found using a vertical battery grip on my SLR that has an extra shutter button on it allows me to do vertical photos without having to put my hand over the top of the camera and have to stick my elbow out. It used to be an option only on pro cameras, but even many entry-level SLR cameras have them available today. As an extra benefit, they also carry two batteries to give you twice the battery life between charges.
Also, if you're using an SLR, be sure to get your left hand under your lens. Unlike with compact cameras, SLR lenses can be heavy and long. If you're not putting a hand under that weight not only are you putting a strain on the lens mount but it's like holding a long stick out in front of you and trying to keep the end from wobbling.
Don't forget about your legs. The same principles that apply to tripods and monopods apply to you. Stand with your feet a shoulders width apart and especially if you're shooting with long lenses, lean against something solid if you can. Keep your elbows in and make sure you're supporting your camera effectively and you'll increase your percentage of sharp photos without spending a dime.
One more thing: indoors or otherwise too low light to get freeze action? It hurts me to say it but...use flash. I hate flat on camera flash lit photos but it's better than getting a streaky mess. And if you read my previous post, you saw how you can find creative ways to make that flash work for you.
If you learned something useful from my site and want to help me keep it going you can buy through our affiliate Amazon.com Camera Store . Thanks!
Saturday, February 6, 2010
Expressing Yourself Through Photography: Depth of Field
The one technique that will make the biggest difference in the quality of most peoples photos is depth of field. Depth of field is essentially how much of a photo is in sharp focus, from the front to the back. It's the reason that most snap shots look flat and uninteresting. Shallow depth of field isolates your subject from the background, while a deeper focus is many times distracting to a viewer because your subject is just as focused as a painting on the wall or the people behind them, for example. On the other hand, sometimes you want that deep focus if you're shooting a landscape or a large group. It all depends on the look you want. I want to show you some tips on how to get it.
So how do you achieve your optimal depth of field? There are basically four factors.
1. Subjects distance from background/foreground.
If you put your subject with their back against a wall it's gonna look like a mug shot. If you instead put that subject on a hill overlooking a city, the background will fall more out of focus. That's an exaggerated example, but the idea is to put everything you don't want in focus as far behind, or in some cases in front, of your subject as possible.
2. Camera distance from the subject.
The closer you get to a subject, the shallower the depth of field. Only having someone's nose in a photo because you want to blur the tree behind them is not exactly optimal though so we use this technique in relation to...
3. Focal length of lens
Getting right in someone's face is not always make for good photos so use a longer lens to zoom in on your subject. This has the added effect of a more flattering perspective, especially with peoples faces (wide lens make things look um...round).
4. Aperture
The aperture is the opening at the back of the lens that controls the amount of light that gets through. Through the magic of physics it also controls your depth of field. The aperture is measured in f-stops and the smaller the number, the wider the opening (I know, it seems kinda backwards). The wider the opening, the shallower the focus. If you want more of the photo in focus, dial that aperture number up farther. Part of the reason that professionals shoot with these huge, wide aperture lenses is to get that shallow depth of field.
Here's an example of putting many of those factors to work together:
-7.jpg) This is a shot of Dweezil Zappa playing at Rothbury in 2009. The only parts of the photo in focus are the hands and the parts of the guitar around the hands. The parts closer, such as the lettering on the toggle switch, and things farther away, like his shirt or the lighting rig behind him, are out of focus. This was shot with a fairly long focal length (about 155mm), from about 6-7 feet away with an aperture of f/5. Notice it has just the parts I wanted to bring attention to in focus and everything else falls out of focus so as not to distract attention from the subject.
This is a shot of Dweezil Zappa playing at Rothbury in 2009. The only parts of the photo in focus are the hands and the parts of the guitar around the hands. The parts closer, such as the lettering on the toggle switch, and things farther away, like his shirt or the lighting rig behind him, are out of focus. This was shot with a fairly long focal length (about 155mm), from about 6-7 feet away with an aperture of f/5. Notice it has just the parts I wanted to bring attention to in focus and everything else falls out of focus so as not to distract attention from the subject.Shooting with a compact camera presents some challenges for those wanting shallow depth of field. Small sensors in compact cameras mean small lenses and short focal lengths. By setting up your subject correctly and using the zoom you can do better than mug shots, but you won't get the silky smooth backgrounds you can achieve with an SLR camera and a long, wide aperture lens. That's why they cost ALOT of money though.
If you learned something useful from my site and want to help me keep it going you can buy through our affiliate Amazon.com Camera Store. Thanks!
Thursday, January 28, 2010
Expressing Yourself Through Photography: Shutter Speed
If photography is capturing a moment in time, it's your shutter speed that determines how long that moment lasts. It opens at the beginning of an exposure to let light into the camera and closes at the end. The longer the shutter is open, the brighter the image will be. On the other hand, the quicker the shutter speed, the more likely you are to freeze your subject and not get blur.
The shutter in a SLR-type camera (film or digital) is kind of like the horizontal blinds you might have on your windows. Just like those blinds, they pull up to let the light in and drop back down to cut it off. In small digital "point-and shoot" type cameras, they don't have a physical shutter but they achieve the same result by just turning the digital sensor on and off. Either way, it's essentially the same result.
A good rule of thumb for shutter speed to get sharp images is at least 1/focal length. Which means if you're shooting with a 100mm lens or a zoom lens set to 100mm, you should be shooting at a shutter speed of at least 1/100th of a second. I say "at least" because especially if you're a beginning photographer, you may want to err on the side of a faster shutter if you can to compensate for your still developing camera holding technique. Holding your camera steady is a very important aspect to getting sharp photos at any shutter speed, and I'll be covering this topic on a future blog of it's own. For now suffice to say that it's better to give yourself a couple clicks faster shutter if you can, rather than get blurry images and wish you had later.
Now that we have the basics taken care of, what can we do to use these rules to be creative? Well, you can do something like this:
.jpg)
This is a composite of two images. One taken to capture the cars going away from me and one for the cars coming toward me. Each exposure was for 10 seconds at f/11. Obviously, you couldn't hold the camera very still for this long so a tripod is used.
If you wanted to take this technique a little further you can introduce a flash to do something like this:
-8.jpg)
This was a 20 second exposure at f/20 where I simply stepped in front of the camera during the exposure and manually popped a flash that I was holding under my face. Since the flash didn't hit the rest of my body, it doesn't show up in the photo and when I stepped away, the church behind me was exposed by the street lights.
Now lets take it a couple steps further and combine an on camera flash, a zoom lens and motion in the equation:
-19.jpg)
I took this photo of a man in the audience at a Grateful Dead show who was swinging torches around himself on the ends of chains. It's an example of a technique I developed for shooting performances involving fire that is a combination of a long exposure, a zoom lens, and what is called "rear-curtain flash sync". Rear curtain sync means the camera fires the flash at the end of the exposure instead of the beginning. It's also called "dragging the shutter". Not every camera can do it, however, because with the short exposures that you normally use for snapshots it doesn't really matter when the flash goes off, but if you want to show a subject in motion, you'll want to freeze them at the end of a motion through a frame not at the beginning. Otherwise, they look like they're going backwards. Unless that's what you're after, in which case leave the camera on it's normal setting.
I also zoomed from the long end of my lens' range to the wide end during the exposure to give it the impression of being two exposures and to give it a three dimensional look with the fire coming out at you.
I hope that gives you some basics on the theory of shutter speed as well as some ideas on how you can use it creatively. As always, I'd love to see what you've done with it or if you have other tips of suggestions.
If you learned something useful from my site and want to help me keep it going you can buy through our affiliate Amazon.com Camera Store
Tuesday, January 26, 2010
Better Photography On A Budget Part 1: Macro Photography
One of the best things about photography is the ability to look at things in a different way than you can with the naked eye. Some examples include: short depth of field, wide-angle distortion, exaggerated perspectives, alternative color processing techniques, and even black and white. One of the more obvious forms of this is macro photography. Macro photography is making a 1:1 reproduction on film or a digital sensor, but the term is used often to describe any kind of extreme close-up photography. Most camera lenses can't do macro (even though many say they can), because they just can't focus that closely. They're designed to focus in the range that most pictures are taken, which isn't normally inches away. For macro photography, getting that close to your subject is usually necessary.
Buying lenses designed for macro photography can an expensive proposition. This Nikon 105mm VR macro for example. Especially if you're not sure how much you're going to use it. I have an alternative method that may let you dip your toe in the macro water before diving in head (and wallet) first.
This is a standard 50mm f1.8 lens:
If you don't have one, you should. Not to get off topic but no one lens will advance your photography skills like this one. Every camera manufacturer makes one. They're cheap,they have a wide aperture so you can shoot in low light, and the focal length actually makes it a decent portrait lens on digital cameras. It's not a zoom so you're forced to move your feet to compose the shot which is actually a good thing for beginners because it makes you think more about your framing and how distance effects your perspective. But...I digress. Back to the subject at hand.
How does this lens pertain to macro photography? The closest you can be to your subject according to the specs is 1 1/2 feet. Pretty close but not hardly close enough for what we want to do. So, what we want do do is this:
-1.jpg)
That looks a little different, huh? What I've done is just make a mount that will allow me to put a lens on backwards. Which with this lens makes it able to focus really REALLY close. Actually, that's all it can do. Without actually being connected to the body electronically there's no auto-focus, you have to adjust the aperture manually, and you lose any lens related metadata that is usually written into your files. But you have a (super) macro lens for next to no money.
Here's what the mount looks like:
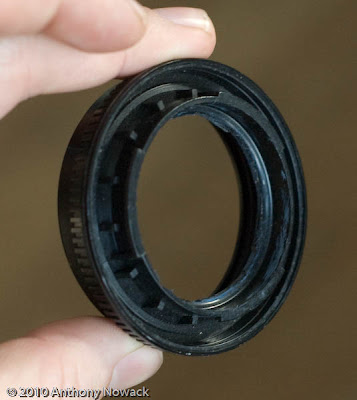-2.jpg)
-3.jpg)
It consists of a UV filter that I took the glass out of (carefully), and a body cap that comes with every slr camera that goes in the place of your lens when you don't have one on. If you're like me, there's always a lens on your camera though so this thing was just collecting dust anyway. If you have to buy one, I think they only cost a couple bucks. Same with a cheap filter. Many camera stores have bins of used filters that they'll give you for next to nothing. Doesn't matter what kind of course because you're going to break the glass out of it anyway. Just get one that matches the thread size of your lens, in my case 52mm.
Take the body cap and cut the center out with a sharp tool (VERY carefully, it might be thick). Then super glue the cap and the glass free filter ring face to face so that you can screw it to the front of your lens when you're done. Let this sit for at least a couple hours to dry. Super glue will bond instantly but it also gives off fumes that like to make a nasty coating on glass. DO NOT put this on your camera or lens right away. If you can find a fume free adhesive that works just as well, let me know. I'd love to not have to use this stuff. When you're done and fume free, mount the lens and find some subjects you'd like to get really close to.
A couple things to keep in mind with macro photography:
1. The focus distance is VERY limited. We're talking centimeters.
2. The depth of focus is paper thin. Even at narrow apertures. I'd start out with two dimensional subjects.
3. "You're gonna need a bigger light." Lighting is another challenge because you're so close and shooting at narrow apertures to get any kind of focus depth that you need to throw a lot of light in. Watch out for shadows from the lens too.
4. Use a tripod. Handholding your camera while shooting this close is a recipe for frustration. Not only are your vibrations magnified as much as your subject, but moving just a couple centimeters back or forward will change your focus drastically.
5. Be careful not to actually hit your subject with the lens. You're going to be about that close.
Macro photography is definitely a challenging endevour but the results are unlike anything you can get other wise. Here's a photo my daughter took of a flower with this set up:
-3.jpg)
I'd love to see your results as well. Feel free to experiment with different lenses and materials. You're not actually doing anything to the lens itself so try this with whatever you've got.
Buying lenses designed for macro photography can an expensive proposition. This Nikon 105mm VR macro for example.
This is a standard 50mm f1.8 lens:
If you don't have one, you should. Not to get off topic but no one lens will advance your photography skills like this one. Every camera manufacturer makes one. They're cheap,they have a wide aperture so you can shoot in low light, and the focal length actually makes it a decent portrait lens on digital cameras. It's not a zoom so you're forced to move your feet to compose the shot which is actually a good thing for beginners because it makes you think more about your framing and how distance effects your perspective. But...I digress. Back to the subject at hand.
How does this lens pertain to macro photography? The closest you can be to your subject according to the specs is 1 1/2 feet. Pretty close but not hardly close enough for what we want to do. So, what we want do do is this:
-1.jpg)
That looks a little different, huh? What I've done is just make a mount that will allow me to put a lens on backwards. Which with this lens makes it able to focus really REALLY close. Actually, that's all it can do. Without actually being connected to the body electronically there's no auto-focus, you have to adjust the aperture manually, and you lose any lens related metadata that is usually written into your files. But you have a (super) macro lens for next to no money.
Here's what the mount looks like:
-2.jpg)
-3.jpg)
It consists of a UV filter that I took the glass out of (carefully), and a body cap that comes with every slr camera that goes in the place of your lens when you don't have one on. If you're like me, there's always a lens on your camera though so this thing was just collecting dust anyway. If you have to buy one, I think they only cost a couple bucks. Same with a cheap filter. Many camera stores have bins of used filters that they'll give you for next to nothing. Doesn't matter what kind of course because you're going to break the glass out of it anyway. Just get one that matches the thread size of your lens, in my case 52mm.
Take the body cap and cut the center out with a sharp tool (VERY carefully, it might be thick). Then super glue the cap and the glass free filter ring face to face so that you can screw it to the front of your lens when you're done. Let this sit for at least a couple hours to dry. Super glue will bond instantly but it also gives off fumes that like to make a nasty coating on glass. DO NOT put this on your camera or lens right away. If you can find a fume free adhesive that works just as well, let me know. I'd love to not have to use this stuff. When you're done and fume free, mount the lens and find some subjects you'd like to get really close to.
A couple things to keep in mind with macro photography:
1. The focus distance is VERY limited. We're talking centimeters.
2. The depth of focus is paper thin. Even at narrow apertures. I'd start out with two dimensional subjects.
3. "You're gonna need a bigger light." Lighting is another challenge because you're so close and shooting at narrow apertures to get any kind of focus depth that you need to throw a lot of light in. Watch out for shadows from the lens too.
4. Use a tripod. Handholding your camera while shooting this close is a recipe for frustration. Not only are your vibrations magnified as much as your subject, but moving just a couple centimeters back or forward will change your focus drastically.
5. Be careful not to actually hit your subject with the lens. You're going to be about that close.
Macro photography is definitely a challenging endevour but the results are unlike anything you can get other wise. Here's a photo my daughter took of a flower with this set up:
-3.jpg)
I'd love to see your results as well. Feel free to experiment with different lenses and materials. You're not actually doing anything to the lens itself so try this with whatever you've got.
If you learned something useful from my site and want to help me keep it going you can buy through our affiliate Amazon.com Camera Store
Wednesday, January 20, 2010
New blog series and more
I'm taking up a new track for my my blog. I'm going to be starting a new series of articles with tips and tricks to help you explore new photographic avenues without re-mortgaging your house. I'll be showing you ways to modify things you might already have, inexpensive gear to buy that will do the job of much more expensive gear, and techniques that may save you from buying anything at all. I'm a Nikon shooter so many of my specific equipment recommendations will be Nikon-centric, but other manufacturers (Canon, Pentax, Sony, etc.) will have similar or equivalent pieces that will also work. Along the way, if I make a recommendation on equipment, I'll insert links to a website or two where you can find them, and clicking those links and buying through them will help me keep the website going.
But this isn't ultimately about gear. It's about thinking differently about how to make photos. If you have a photographic challenge, it's easy to throw money at it. Photography is one of the few lines of work where you can essentially buy into your job. Ultimately, though, as a photographer you're judged by your work, not what you used to create that work. So however you get to your photographic goals, the important thing is that you get that shot. After that, whatever you put together to get it doesn't matter. But thinking differently about what we value about photography does.
I'll also be posting more informative blogs about the basics of photography. Things as rudimentary as exposure, aperture, and composition all the way up to the infinite variables of lighting techniques. I've had people ask me about putting on classes or workshops, and while I'm leaving that door open, I thought I'd rather reach a wider audience with my blog. Then if you learn something useful that you'd like to try, you can spend the money you would have spent on classes instead on that new lens or a tripod or some other tool to expand your photographic palette. Then if you choose to support what I'm doing, you can use the links I'm providing to get those things and I'll get a little kick-back. Kinda like PBS except there's no pledge drives and the "thank you gifts" are much better.
I saw an interview with Quentin Tarantino once where he was asked what his advice for aspiring filmmakers was and he said basically just to get out there and do it. Spend the money you would have spent on school on a camera instead because you'll learn faster just doing it than sitting in a classroom. I would also add there's things that experience will teach you that you can't learn otherwise. So I'd also like to see people posting their results and experiences with the subjects I cover. Art is more than a lecture. It's a conversation.
If you learned something useful from my site and want to help me keep it going you can buy through our affiliate Amazon.com Camera Store
Subscribe to:
Posts (Atom)