If photography is capturing a moment in time, it's your shutter speed that determines how long that moment lasts. It opens at the beginning of an exposure to let light into the camera and closes at the end. The longer the shutter is open, the brighter the image will be. On the other hand, the quicker the shutter speed, the more likely you are to freeze your subject and not get blur.
The shutter in a SLR-type camera (film or digital) is kind of like the horizontal blinds you might have on your windows. Just like those blinds, they pull up to let the light in and drop back down to cut it off. In small digital "point-and shoot" type cameras, they don't have a physical shutter but they achieve the same result by just turning the digital sensor on and off. Either way, it's essentially the same result.
A good rule of thumb for shutter speed to get sharp images is at least 1/focal length. Which means if you're shooting with a 100mm lens or a zoom lens set to 100mm, you should be shooting at a shutter speed of at least 1/100th of a second. I say "at least" because especially if you're a beginning photographer, you may want to err on the side of a faster shutter if you can to compensate for your still developing camera holding technique. Holding your camera steady is a very important aspect to getting sharp photos at any shutter speed, and I'll be covering this topic on a future blog of it's own. For now suffice to say that it's better to give yourself a couple clicks faster shutter if you can, rather than get blurry images and wish you had later.
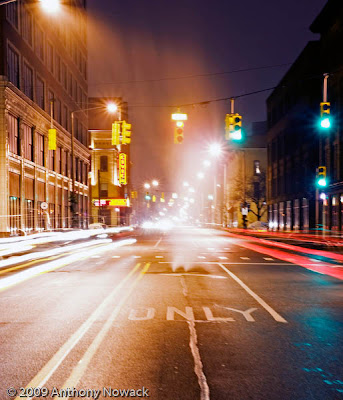
Now that we have the basics taken care of, what can we do to use these rules to be creative? Well, you can do something like this:
.jpg)
This is a composite of two images. One taken to capture the cars going away from me and one for the cars coming toward me. Each exposure was for 10 seconds at f/11. Obviously, you couldn't hold the camera very still for this long so a tripod is used.
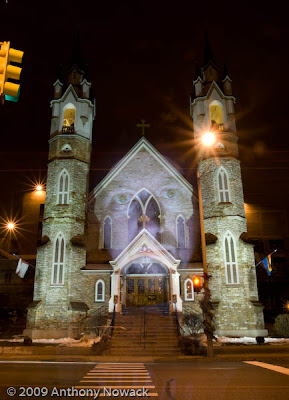
If you wanted to take this technique a little further you can introduce a flash to do something like this:
-8.jpg)
This was a 20 second exposure at f/20 where I simply stepped in front of the camera during the exposure and manually popped a flash that I was holding under my face. Since the flash didn't hit the rest of my body, it doesn't show up in the photo and when I stepped away, the church behind me was exposed by the street lights.
Now lets take it a couple steps further and combine an on camera flash, a zoom lens and motion in the equation:
-19.jpg)
I took this photo of a man in the audience at a Grateful Dead show who was swinging torches around himself on the ends of chains. It's an example of a technique I developed for shooting performances involving fire that is a combination of a long exposure, a zoom lens, and what is called "rear-curtain flash sync". Rear curtain sync means the camera fires the flash at the end of the exposure instead of the beginning. It's also called "dragging the shutter". Not every camera can do it, however, because with the short exposures that you normally use for snapshots it doesn't really matter when the flash goes off, but if you want to show a subject in motion, you'll want to freeze them at the end of a motion through a frame not at the beginning. Otherwise, they look like they're going backwards. Unless that's what you're after, in which case leave the camera on it's normal setting.
I also zoomed from the long end of my lens' range to the wide end during the exposure to give it the impression of being two exposures and to give it a three dimensional look with the fire coming out at you.
I hope that gives you some basics on the theory of shutter speed as well as some ideas on how you can use it creatively. As always, I'd love to see what you've done with it or if you have other tips of suggestions.
If you learned something useful from my site and want to help me keep it going you can buy through our affiliate Amazon.com Camera Store

No comments:
Post a Comment